Thursday 17 October 2013

Updating a Family Buffet

I refinished this buffet as a commission for a new client. I met Linda's daughter at the Cole Harbour Harvest Festival last month, where she had bought one of my pieces. Linda got in touch with me and wanted me to refinish a buffet she had. Originally she planned on doing it herself; as you can see in the before picture, she had already started to sand the top half.


We decided to paint the buffet, since there were a lot of tones and different grain lines on the piece. I layered a lighter grey over a darker grey, and distressed the whole piece so the base colour could show through. After using dark paste wax to seal in the paint, I sprayed the existing handles an heirloom white.


The grey colour really gives the buffet an updated, modern look, yet the wax and distressing still give it a little bit of old charm. I really love how this turned out, and I'm even happier that Linda loves it too.


Tuesday 10 September 2013

Farm House Table

I have seen a few Farm House table tutorials online and in magazines, and really wanted to give it a try! I've had this table for about a year; it's been sitting in my basement, begging to be refinished.


First, I unscrewed the original top from the table base. The top had been covered in mactac, so it was left in pretty hard shape. I painted the entire base in a white, which I mixed into chalk paint (see DIY tab for recipe). After lightly distressing it, I used a dark paste wax to give it that antique look.


For the top, I went to my local building supply retailer and purchased 2 1x6x10' pieces of cheap lumber. I even went so far as to search through the pile to find pieces that had knots, cool grain lines, and even some that had bark left on it. I had them cut into 30" pieces, knowing that I wanted the overall table top to be a square. After connecting them with 2 small pieces of 3" wide slats and finishing nails, I stained the whole thing in Minwax Jacobean. The colour is PERFECT! It looks old, rustic, and well lived in.

 
Overall I love how this turned out! I think I might re-do my dining table in this same look. Stayed tuned!

Back in Black

Today I was at the Cole Harbour Harvest Festival with a selection of my furniture for sale. We sold two pieces and gave away tones of business cards! It's always nice to hear comments from people on your work; it's motivating at the very least! Here is the latest dresser I finished! I loved the rounded mirror and the waterfall style top. I decided I wanted to try a 'pottery barn' type of finish on this piece since it was a lighter colour wood. After painting the entire dresser black with chalk paint, I distressed and waxed it with Minwax Dark Paste Wax. The reason I decided to wax instead of polyurethane, was so that it was left with a very vintage, flat finish. It turned out great! After spray painting the two handles, and adding two crystal knobs for the top, it was ready for sale!


Tuesday 18 June 2013

Obsessed with Distressed!

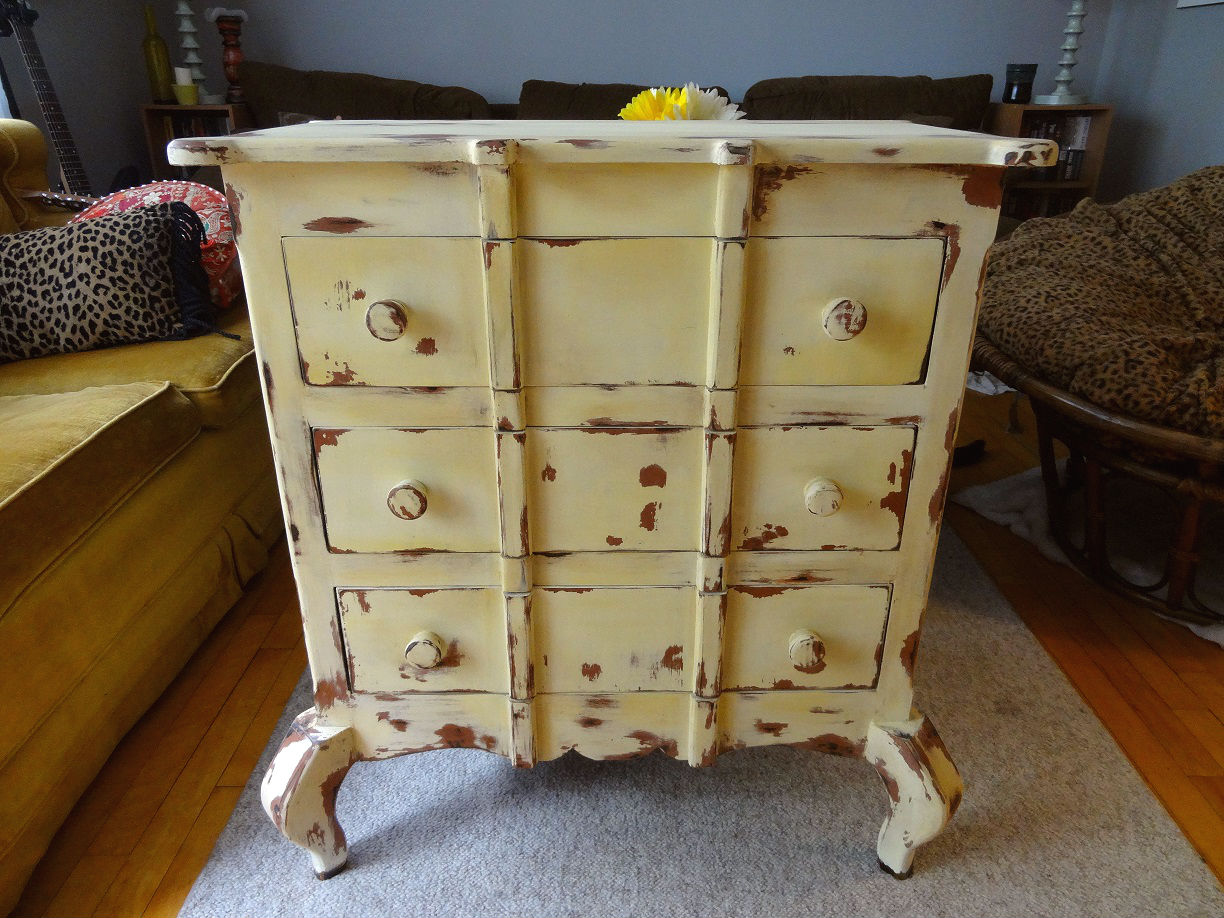
If you haven't noticed already, I am OBSESSED with distressed and antiqued furniture. There's something about layered, chippy paint that is so delicious; I want to make every piece look old and something that has a history. This latest dresser highlights my love for this effect.


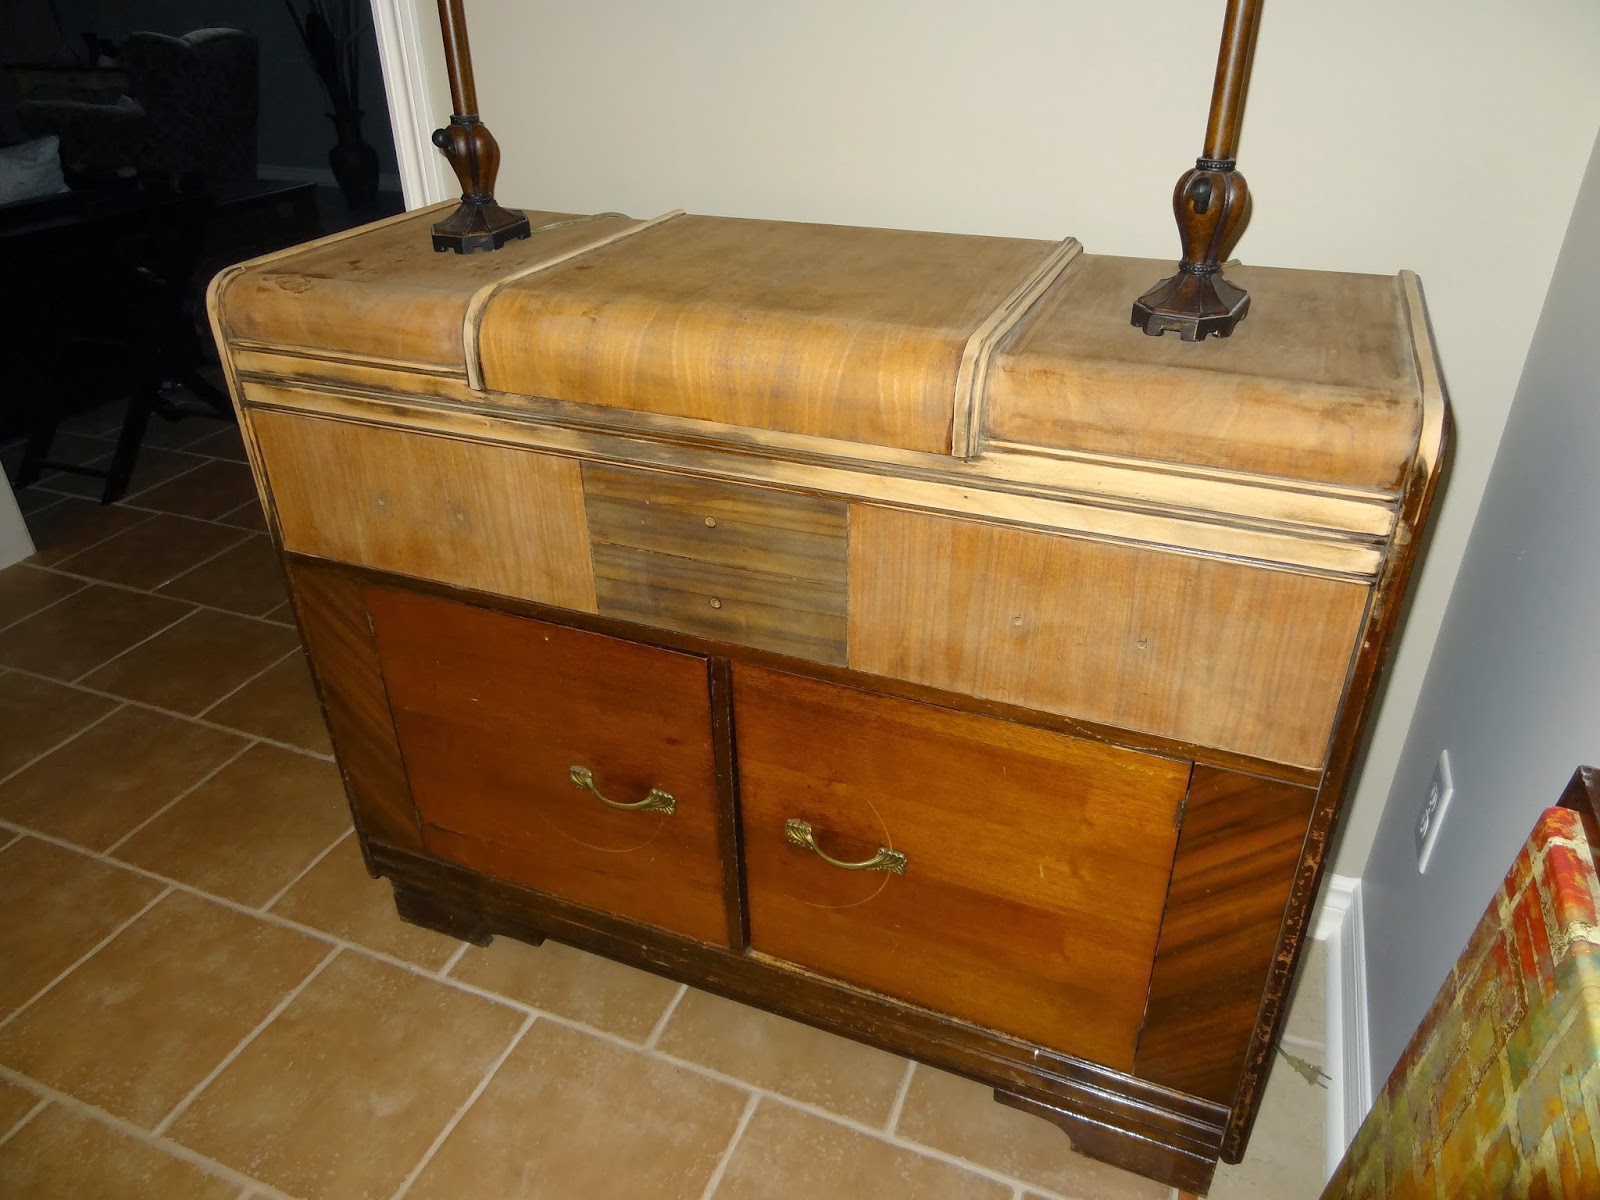
My Mom found this at HomeSense last summer and it has been sitting in her shed ever since. On the weekend I finally went and got it, knowing it would be perfect for a new painting technique I've been dying to try!
First I painted the whole dresser in a rustic red, knowing that this was going to be the colour of the paint to show through. After two coats of that went on, I then rubbed petroleum jelly over all the places I wanted the top colour to chip off of. As you can see, I went a little nuts with this step. I really wanted it to be heavily distressed, so I put the jelly along a lot of the edges, corners, and on the drawer facings.


After letting the jelly dry for about a hour, I applied two coats of the creamy white, with golden tones painted throughout. Once everything was dry (I waited overnight), I took 200 grit sandpaper and lightly sanded the entire piece. It was amazing how well the creamy white paint came off, revealing the red underneath. In some places I sanded through the red as well to show off the original dark brown of the dresser. A little antiquing wax later and this dresser was transformed from boring to truly unique! I LOVE how it turned out and can't wait to try this technique again!


Thursday 13 June 2013

Antique Lilac Blue Dresser

WOW! It's been so long since my last post! I've had a lot of other things going on since last summer, but that's still no excuse for neglecting my blog. I'm officially back at re-finishing furniture and am so excited to get this going again! My Mom recently found a fabulous antique dresser for me, which was in pretty hard shape. I was so pumped to re-finish this piece that I had it done, from start to finish, in about 2 days.

I wish I had of taken a before picture of it (sorry Mom!). It must have been stained quite a few times over the years, because the finish was so thick, it look me 3 tries to strip the stain and poly off the top. I re-stained the top in a natural oak (B-UTIFUL!), and painted the body of the dresser in a shade I call Lilac Blue. After shading and waxing, the piece looks amazing! SO shabby chic!

There will be much more to come, I'll keep you posted!


Saturday 21 July 2012

Market and a Nightstand

Well its been another great day at the Alderney Market! I set up my furniture and some painted signs right by the water today, and what a view that was all day. It couldn't have been better weather, and there were soooo many people around since it's the Tall Ships Festival this weekend. I met alot of really nice people and there was a lot of interest in my stuff. I even sold one of my Chair Planters! You can kind of see it in the picture.

I just finished another project, this time a really interesting nightstand. I found it at Value Village for $14.99; it was quite dated, but I knew all it would take is a little paint and antiquing! Heres the before picture:
After painting it blue and white, I distressed it with 150 grit sand paper and then used dark paste wax to give it that nice aged look. The top needed something, so I stenciled a blue border using painters tape. I think it gave it just that little extra touch of interest!


I've got a great collection of furniture projects to keep me nice and busy this week. My chair planter was popular at the market so I think I'm going to try getting more of those finished. A friend from work has already placed an order! My mom also scored a really awesome dresser at Homesense for $50, it was marked down from $250 since a leg had fallen off! Also, Jen and Jackie found a really great cedar chest for my at a yard sale. I'm so excited to dive right into painting this week, I just wish I didn't have to work! haha.

Thanks for reading!

Wednesday 18 July 2012

Funky Junk Bench

This week I want to try and get a couple more furniture items finished so I can bring them this weekend, so it will be a busy one for sure. Here’s my latest project which will be at the market on Saturday. It a great bench my aunts found on the curb, and me and mom went to pick up. Someone must have tried to reupholster it before, and man did they ever do a terrible job haha! They used this really dated flower fabric and instead of using a staple gun, they used a million tiny nails. Not only that, but they chose to paint the bench AFTER they upholstered it, so of course there was white paint all over the fabric. All of this added to up a very tough job getting all the old fabric off the bench.


This bench really represents the term “up-cycling”. Not only did I save this from being trashed, but the fabric I used was actually an old curtain that I found at the Salvation Army for $2.99! I loved the print and colours of the curtain, but I had a rip in it and there was only one. I knew I could use it for something so I bought it and tucked it away. The paint was also somewhat recycled. I found it on the mistint table at Kent, so it was only $5 as opposed to $20!

After painting the frame Black, I upholstered the bench seat and two front cushion panels. I ran out of fabric for the back, so I bought this great black material for the two back cushion panels. After that I finished it off by gluing on a red decorative trim to hide the staples.